


Latest Blog

Multimedia Interaktif Tata Surya
Membuat Multimedia Pembelajaran Interaktif tentang tata surya
ALL BLOG
Latest Games

The Making of Ace Trucker
Introduction
Welcome to my blog, and this is my first post. At the begining I want to introduce my self. My name is Wandah, I'm flash game developer since 2005 and I've made some flash games like Sim taxi, Ace gangster, City Driver, Dwarf Village, Master of the Secret sea, Ninja Master, Words Kingdom and about 30 other titles. You should know that I am not a programmer but I am an artist, I know little about programming languages (especially Action Script), so if you find a method that I use here not following the programming standard, that's because I not a real programmer. I have made all the games by myself, graphics and code all done by me, but not for the sound ( I have to pay someone to do it, or just download it from some sites).
All of my games were using 2D graphics. My tendency to work with 2D graphics was because 3D platform with flash is quite complicated. I've tried combining flash with Papervision, away3d and sandy3d, but I was stuck until one day when Adobe announced that Flash has a new feature stage3D and followed by several applications such as flare3D and alternativa3d. That's makes me want to try to learn again - making 3D flash games.
After I tried several alternatives and at the end I chose flare3D, because it gives the main features in developing 3D based applications and most importantly flare3D has a very complete documentation along with examples of applications that I can learn easily.
My first idea was to develop a game that is easy to make, does not require a lot of graphics, and well liked by the browser games players. My choice fell on the parking game type . The reason is simple : game about cars, trucks, driving, always loved by browser games players. The engine to control the car have already been discussed in one of the examples in the flare3D documentation file , so it only need slight modification to regulate the movement of trucks with trailers and detection of objects around. Btw if you never played Ace Trucker you can see this screenshot and click it to play!
At this post I will try to explain a little about the making of the Ace Trucker. Not all about it, just the most important concept about it. There are two main points, modeling and coding. let start with the modeling
3D Modeling
I done the modeling in a week, it wasn't fast because the models are very simple and only 15 models that I made. Basically there are 3 main models which are truck, envi objects and road. I will not explain about how to make the lowpoly model, since you can get much more better information about modeling on 3D forum ( Polycount Forum is one of my favourite). In this post, i just want to explain about something that you should do with the modeling process to make your coding job easier.
- Make it as lowpoly as possible
Remember that the game output is a browser games, so it must be lightweight for the browser. Limit your poly budget as low as possible and play with a good detailed texture.
- Set the unit size into centimeters
If you are 3DsMax user you can set up your measurement unit into centimeters/milimeters. Why doing this ? this will help us a lot to make a simple object placement and object detection. I will explain it later, keep reading
- Avoid using mirror object
in 3Ds Max when you use mirror - something bad with the texture will happen. You'll see it normal on the viewport render or Flare3D preview, but when you add your model to the scene3D, the model will look darker. This happen because the texture position is flipped (I am using Flare3D 2048c) note: please correct me if i was wrong about it.
- Pay attention on the Pivot direction
Pivot position is very important. Make sure the truck/car position facing the x-axis, this will help a lot to calculate the truck movement - Optimize the texture
F3D file size is depend on the complexity of the model and the texture files. Use PNG (512px x 512px) or larger, but make sure its not too big. In Ace Trucker, I use 3 textures : one for truck, one for envi objects and another one for the road, total filesize is about 1.73MB - Tiling images for the road
In Ace Trucker, I need big space with grass, floor, and road. If I use small size images (less than 512x512 pixel) as texture, the model will seen blurry, but if I use big texture for high detail, I will get my SWF filesize bigger and that is not good for browser games. So I use tiling images, I just made a pattern for the grass tile, floor and road then edit the texture material with unwrapUVW editor - Name the model and write down the model size
I use this to make it easier when I build the game's level. I will explain it later.
Take a look my Ace Trucker model, you'll see only simple low poly model with small size texture, and when I export it into F3D type the filesize is only 1.76 MB
Programming : Level Design
When the models done my next step is writing some codes. I will divide it into 2 points : level design and physic. Lets start with level designing.
If you try playing some 3D flash games that already exists. Usually you'll find that the games will load the 3D model in each different level, if I pass the first level i have to wait some several seconds-minutes to load the next level. I want to avoid this is to reduce the filesize and make the level change very quick so that players do not get bored waiting. The way I use is by using a simple array.
Remember that I write down all the name of the 3D models and the size? I use that name and size and put it together into one array. See the picture below:
At the reg_object array, I save the name and the size of the models. This is usefull for clone the specific object base on the name. While at the obs_0 array, I save the position of each object that i use to build the level. The build_obs function, will clone the model based on the name that saved on the reg_object array and put it in the correct position based on the obs_0 array. I hope you can get my point, its very difficult to explain it in english.
Question is : I know about writing the down the model name and put it into an array, but how to make the obs_0 array, there are so many number on it?
To generate the objects database that saved on the obs_0 array, I made some simple flash application that produce the level array. Look at the picture below :
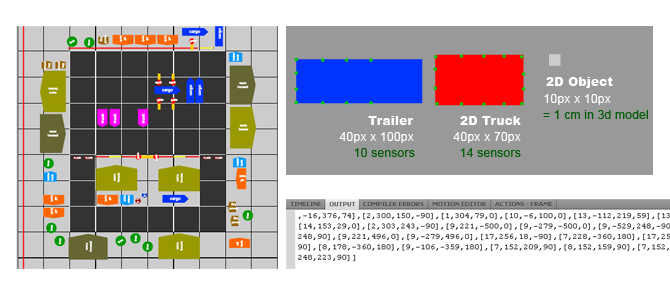
I made some movieclips, and the movieclip's size is based on the 3D model size. I give you some example : The 3D Truck model is 4cm x 7cm, I made some simple scale system where 1 cm unit on the 3D model is equal to 10px by 10 px, so the size of Truck in "2D" is 40px x 70px. I made all the "2D version" of the models - and give them an id (object type on obs_o array), After that I can easily put the "2D version" of the scaled model on the stage, duplicate it and move it to get a good level design and then trace the id, x-y position and rotation. As you can see on the picture, I got the level array on the output panel. After that, simply copy the array and try it on the 3D view using the build_obs function and if the level is look good and playable then go to the next level, no need to reload the model - just clean the "cloning models" and re-clone the model using the next array level. That is the way that i use in Ace Trucker to make it fast (without loading) when changing level. and with this method I can make so many levels without adding significant filesize.
That is not all about the array for level design. I also made some array for the road with the same method. Now lets move to the physic thing.
Programming : Physic and Hit Detection
Before explaining about the physic, movement and detection you have to know that I am not a real programmer and I try as possible to avoid the physic, so my explanation below maybe is not a good way.
There are some important point that we have to know about Ace Trucker physic:
- Ace Trucker using flat surface
So it does not require special physic to detect the colission between wheel and the road surface. At this point we can use 2D calculation, so car movement and trailer movement is calculated on 2D way
- Truck Driving Engine
For the truck movement you can check the tutorial that included in the flare3D installer (see Test05_Movements). Ace trucker using the same method like that tutorial.
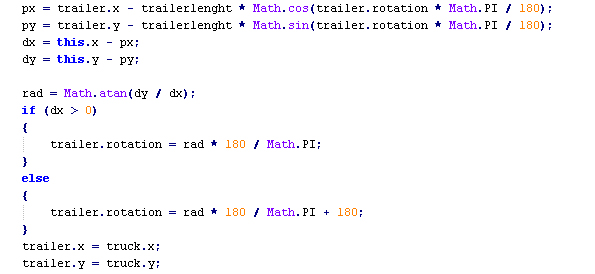
- Trailer Movement Engine
The trailer movement engine is quite simple, you can use simple math operation to calculate the angle and the position of the trailer relative to the truck. Check the picture below and the 2D version of the truck and trailer movement :
- 2D calculation to 3D calculation
After doing some experiment with movement on 2D, now we can bring it into 3D platform. There are coordinate differences between 2D and 3D, and remember that the truck only moving on the flat surface, mean that y-axis is never change. In this case Y on 2D platform is -Z in 3D platform, becarefull with that.
- Hit Detection
When I learn about using 2D calculation to 3D platform, its easier for me to do the hit detection in 2D platform. My idea is build the 3D world together with the 2D world. Do all the calculation in the 2D world including the hit detection, then show it in the 3D world. At this point I use simple detection using hitTestPoint. See the picture about level editor above, as you can see my truck movieclip has 14 sensors on it, I use it for hitTestPoint with the 2D obstacles and when the hit happen, simply send the obstacles id to the 3D world and change the object's texture into red.
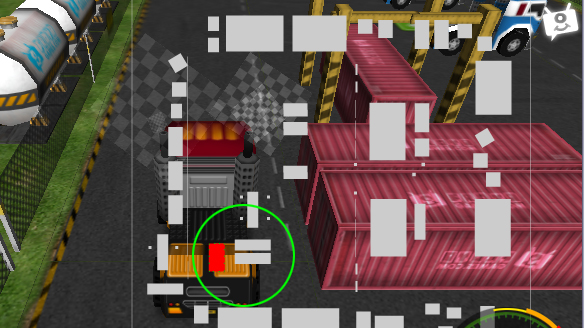
As you can see at the picture above, I've build the 2D world together with the 3D world. At the 2D scene you can see my red truck moving on the Y-axis and at the 3D scene the truck moving on the Z-axis. You can see at the right side of the 2D truck, there are two movieclips that representation of the two 3D red containers. So everything on the 3D world actually controlled by 2D objects.
After the hit detection engine done, I can set the 2D world (2D scene) visibility into false, so player only see the 3D truck looking for the parking area. Then I made some several levels with different difficulty, adding some sounds and eye candy, all done in one week modeling and two weeks coding.
Conclusion
flare3D provide opportunities for me to develop a game using 3D graphics. Flare3D has the most important features like assets control, camera, keyboard and mouse event and other important thing needed for building flash 3D games easily. I recommend to use it for your 3D flash project. Thats it, this blog will discuss my next flare3d project. Thanks for reading :)